
Tips for cleaner, more consistent planner pages — every single time
You printed planner pages from two different designers, and when you trimmed them they came out different sizes.
Or maybe you printed and trimmed five pages from the same file, but they still don’t sit evenly in your planner — one sticks out just a little, another is just a hair too short. If that sounds familiar, here’s the good news: most of the time, it’s not your printer. It’s your trim technique.


These nine tips aren’t about chasing perfection. They’re about consistency — so every page you cut lands the same way, whether it came from one file or ten different designers. The first five cover how to work with your trimmer itself. The last four are where real precision comes in: measuring and making your final cuts count.

I’ve cut thousands of planner pages — and ruined plenty of them figuring out what not to do. These are the nine tips that finally made my cuts consistent.
Prefer to see the tips in action? This post pairs with the video tutorial so you can follow along as I share each tip.
Part One: Working With Your Trimmer
Tip #1 – Don’t Overload Your Trimmer
It’s tempting to cut as many pages at once as physically possible — especially when you’ve just printed a full set of planner pages and you’re ready to be done with it. But pushing your trimmer beyond its rated capacity is one of the fastest ways to get ragged edges, incomplete cuts, and a blade that wears out well before its time.


With a guillotine trimmer, in particular, too many pages at once can damage the trimmer. The bulk of the stack pushing against the blade not only can push the pages to one side. It can torque the blade arm away from the metal edge of the trimmer. And once the blade on the arm doesn’t contact the blade on the trimmer deck – clean cuts will be impossible.
The fix is simple: cut fewer sheets at a time. It feels slower, but your edges will be cleaner and your trimmer will last much longer.

Tip #2 – Position Your Trimmer for Your Needs
There’s no rule that says your trimmer has to face the direction it came out of the box. To get the most control, set it up in whatever orientation actually works for you. Left-handed? Try turning the trimmer around so you can hold the paper steady with your right hand and drive the blade with your left. You might also need to adjust the angle so you can actually read the ruler markings and alignment guides without craning your neck.


And for longer cuts or when you need to apply steady, even pressure across a stack of pages, standing instead of sitting can make a real difference. A little setup adjustment at the start saves a lot of frustration mid-project.
Tip #3 – Use Your Fences and Stops
A sheet of printer paper starts with four straight edges and four square corners — and your trimmer is designed to take advantage of that. Most trimmers have at least one fence or stop along the edge. When you place one straight edge of your paper firmly against that fence, the trimmer helps keep your next cut square.


This matters even more when you’re cutting a stack of multiple sheets. Without the fence engaged, each page in the stack can drift just slightly on its own. With the fence doing its job, the whole stack stays registered together — and every page comes out the same size.
Tip #4 – Keep the Bulk of the Paper on the Deck
Don’t place your pages on the trimmer with most of the sheet hanging off the side. The weight of all that paper can pull on the stack during the cut and shift it, throwing off your measurement. Whenever possible, keep the larger portion of the sheet on the trimmer deck. Then you will be able to hold it firmly in place.
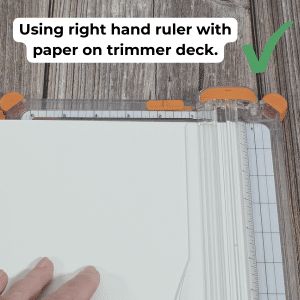

Many trimmers have 1″ to 2″ of ruler markers to the right side of the cutting line or blade.

No Ruler To the Right of the Blade?
Many guillotine trimmers don’t have a ruler to the right of the blade. If yours doesn’t, or if it’s hard to see past the blade and guard, here’s a reliable workaround:
- Place the page on the trimmer with the blade down and the edge you want to trim resting against the blade. The adjacent edge should be aligned against the fence.
- Note the full width of the sheet at that position.
- Carefully lift the blade out of the way.
- Slide the page toward the cutting side by the amount you need to trim.
- Make your cut.

Step 1 – With the blade down, place the page on the trimmer with the edge to be trimmed against the blade and the adjacent edge against the fence. 
Step 2 – Note the full width of the page. 
Step 3 – Carefully reposition (raise) the blade. 
Step 4 – Shift the page to the right by the amount you need to trim. 
Step 5 – Make your cut.
This same technique works with sliding blade and rotary trimmers too. Place the blade somewhere along the length of the sheet first, slide the paper until it just touches the blade, check the full width, move the blade aside, then shift the paper by the trim amount you need.

Tip #5 – Cut in the Direction That Holds Paper Against the Fence
Pay attention to which direction your blade travels relative to the fence — because it matters more than you’d think. If the blade naturally pushes the paper toward the fence during the cut, the fence can do its job and hold everything steady. If the blade pulls the paper away from the fence, the paper is likely to creep during the cut, and your edge won’t be straight.


With a sliding blade or rotary cutter, always make the cutting pass in the direction that presses the paper into the fence. Then, while still holding the paper firmly in place, return the blade to its starting position. On that return pass, you’re not cutting — just resetting for the next clean cut, with your paper still held exactly where you left it.
The first five tips are about working with your trimmer instead of fighting it.
The last four are where consistency really starts to show up in your finished pages.
Part Two: Measuring and Making Precise Cuts
Tip #6 – Pick a Ruler Alignment and Stick With It
Whether you’re lining up trim marks printed on the page or positioning the paper’s edge against your trimmer’s ruler, consistency is everything. You have to decide: does the edge of the paper just touch the line? Just cover it? Or sit centered on it? All three can work — but they give you slightly different results.


That tiny difference is exactly what separates pages that are truly the same size from pages that are only approximately the same size. Pick one approach, use it every single time, and your pages will match across the whole set — and even across different print sessions.
Tip #7 – Mark Your Measurements With Washi Tape
When you’re trimming the same dimensions over and over — like cutting a full week’s worth of planner inserts — it’s surprisingly easy to lose track of which measurement you’re on, especially when you’re switching between two or three different trim widths in one session. A quick and easy fix: use washi tape to mark the measurements directly on your trimmer’s ruler.

Washi tape is thin enough that it won’t interfere with your paper placement for larger measurements, and it removes cleanly from the ruler when you’re done. No guessing, no rechecking, no accidentally trimming to the wrong line. It’s one of those small habits that saves a surprising amount of time and waste.
Tip #8 – Trust the Ruler Over the Trim Marks
Trim marks look precise on the printed page, but they’re not always as reliable as they appear. Different design apps create them differently, and exporting to PDF can introduce tiny positional shifts. If you’ve ever trimmed carefully to the printed marks only to end up with pages that still don’t quite match — that’s likely why.

The ruler on your trimmer is still the most reliable measurement tool you have. And measuring doesn’t have to feel complicated. A good cheat sheet makes it genuinely easy. I’ve put one together that includes: decimal equivalents alongside the fractions, a labeled ruler diagram showing exactly where each fraction falls on a physical ruler, and millimeter equivalents for those who prefer metric.

I also included the calculations for determining the amount you need to trim when you are printing your planner pages centered on larger paper. There an example included for classic-size planner page printed centered on a standard US Letter sheet.
Tip #9 – Always Make the Final Cut to Finished Size
This is the tip that ties everything together. The last trim on each side should always be made to the finished size — not just to however much you think needs to come off. Here’s why that matters: even if one of your earlier trims was just a hair off, trimming to the finished size on your final pass corrects for it automatically.
For a classic-size planner page, the workflow looks like this:
- Trim ¾ inch from one side.
- Trim ⅞ inch from the bottom.
- Then make the final cuts:
- trim the width to exactly 7 inches and
- the height to exactly 9¼ inches.
Those last two cuts — to finished size — are the ones that guarantee your page is correct, regardless of any small variation in the earlier trims. The result: a cleanly trimmed classic-size planner page, ready to punch and drop into your planner.

Putting It All Together
These nine tips are the ones I come back to every time I sit down to trim planner pages. None of them require any special equipment — just a little more intentionality about how you use the tools you already have. Make them habits, and you’ll notice the difference quickly: cleaner edges, more consistent sizes, and pages that actually sit right in your planner the first time.
📥 Free Cheat Sheet — The trimming cheat sheet mentioned in Tip 8 is available as a free download. Get it here.
💬 Questions? Drop them in the comments! — Whether you’re troubleshooting your specific trimmer, figuring out measurements for a different planner size, or just getting started with printing and trimming your own pages, leave a question below and I’ll do my best to help.
Happy planning,
Linda
Tell me what you think …